Email Resources Collator - User Guide
Portal Use and Installation
Introduction
The basic premise of Email Resources Collator (ERC) is to enable user to retrieve links and attachments from the various mailboxes the user might have based on the defined filter.
The benefit of ERC is to aggregate these links and attachments into a centralised location so that the user can download them all from one place.
An example use case scenario is a property investor who might have few personal email accounts whereby the rental statements are sent by the Property Manager to a particular email, and the insurance statements are sent by the insurance provider to another email.
Further to this, as the emails would have been sent within different timeline, when the user looks at his mailbox(es), the emails might have been scattered all over the place buried with other non-relevant emails.
With ERC, the user will be able to define a specific filter e.g. the address of his investment property, and all relevant emails, links and attachments are synched. This would enable the user to download all the relevant links and attachments to that property. At tax return time, the person would be able to easily download all resources and submit them to the tax accountant.
ERC contains of two components:
- Web Portal Component (accessible via the My Account page on the portal)
- On-Premise Outlook component
Web Portal Component
Within the web portal is where you do a lot of the configuration such as defining mailboxes and email filter. These will be guarded by the amount of license subscriptions you have.
You can also perform email synchronisation through the portal.
On-Premise Outlook Component
Users might use Outlook on their laptop/desktop instead of their web mail. And Outlook might by default delete the emails from the server once they are downloaded into Outlook.
ERC comes with an Outlook Add-In which, when executed, will synchronise the relevant mailbox into the ERC portal, allowing the user to then download all links and attachments from within the portal.
Using Email Resources Collator
To use Email Resources Collator (ERC) you must first acquire subscriptions. You can do so by clicking on this link.
A single subscription comes with 1 Mailbox and 1 Filter. If you need more Filters defined for the Mailbox, you can purchase additional Filter license.
Once your license is activated, you can access the Backend Dashboard then start defining your Mailbox and Email Filter. You can access the menu from the left-hand navigation.
Adding Mailbox
To add a mailbox:
- From the Backend Dashboard go to Mailboxes > Add New Mailbox.
- Give your mailbox a title e.g. myemail@operator.com
- Specify the Server host/IP address, username, password, port. This information can be obtained from your email provider.
To add a Gmail account for example, you can specify the following:
- Server host/IP address: imap.gmail.com
- Username: <your Gmail email address>
- Password: <your “Less secure app access” password>
- Port: 993
- Enable TLS: No
- Enable SSL: Yes
- POP3: No
The options:
- Enable TLS: Tick if your email provider requires TLS authentication.
- Enable SSL: Tick if your email provider requires SSL authentication.
- POP3: Tick if you will connect using POP3 connection instead of IMAP
- Use in Outlook: Tick if you want to synchronise this mailbox using the Outlook ERC Add-In.
Adding Email Filter
Email Filter is what is used to search and filter your mailbox. To add Email Filter:
- Go to Backend Dashboard > Email Filters > Add New Email Filter.
- Specify the mailboxes this filter will apply to.
- Specify the Date From/Date To of the emails that need to be filtered.
- Specify the filter criteria eg. From Name, Subject or Keywords. If you use the Keywords filter, it will look for the keywords within the body of the email.
- Finally, specify Use in Outlook if you want the filter to be used in Outlook ERC Add-In.
Synching
From the portal you can perform manual synchronisation. At this time the synchronisation is not done automatically.
To do so:
- Go to My Account > Backend Dashboard > Small Business Hosting Tools > Sync Emails.
- Then click Sync.
This process might take some time to finish. Once finished, the word “DONE” will be printed on the screen.
Viewing Email Assets
Finally, to see the synchronised email assets, go to My Account > Backend Dashboard > Small Business Hosting Tools > Collate Email Assets.
From here you can see your filter, mailboxes, links and attachments.
You can then download the resource manually.

Updating File Types
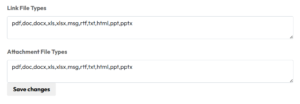
By default the Portal will only filter links and attachments from your emails with the following file types:
pdf,doc,docx,xls,xlsx,msg,rtf,txt,html,ppt,pptx
This is to ensure that only documents are synchronised. If you need to add (or remove) more file types you can do so from My Account > Account Details.
On the Account Details page, down the bottom you can see the File Types section. Make your changes there and then click Save Changes.

Email Resources Collator - Outlook Add-In
Introduction
ERC Outlook Add-In is to be used with your local Outlook instance. This add-in will allow synchronisation of your Outlook email links and attachments into the SBH Portal.
Downloading
To download the ERC Outlook Add-In please click here.
Installation
To install and configure the ERC Outlook Add-In, please follow the following steps:
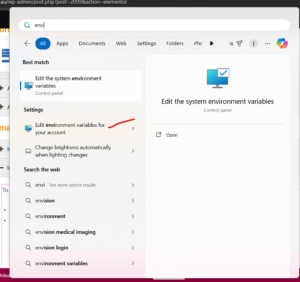
- Click on Windows icon and type in “environment variables”
- Select “Edit environment variables for your account”

- In the Environment Variables window under “User variables”, click Add. Then add the item with the Variable Name of: SBHOutlookSettingPath. IMPORTANT: The setting has to be called exactly this.
- For the Variable Value, specify a local directory path in your machine where ERC Collator Outlook Add-In will store its configuration and exported email links and attachments. Please make sure you have enough space.
- Once the environment variables are defined, the next step is to install the executable. Unzip SBH.Office.Outlook.zip and its content into a local folder within your machine then run setup.exe. You might need to close Outlook at this time.
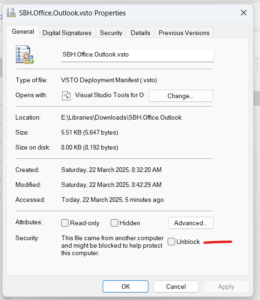
- Please note: Your Windows system might indicate that this is not a safe file. Right click on SBH.Office.Outlook.vsto > Properties and then tick Unblock then OK to save.

- Once this is done, you can proceed with running setup.exe.
- Once installation is finished, a new tab called SBH will appear in your Outlook.
![]()
Add-In Configuration
To configure the Add-In:
- Click on Settings button inside the SBH tab.

- In this section, specify the Portal URL of https://smallbusinesshosting.com.au
- For the SBH Authentication Key, you can find it from the portal. Please go to My Account > Backend Dashboard > Small Business Hosting Tools > Authentication Key
- Click Save to save your configuration
Synching Emails
Once you have specified the Authentication Key and Portal URL (see Add-In Configuration section above), you can now start synching your emails.
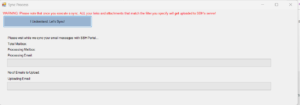
Click on Sync Emails.

Depending on the filter you specify and amount of emails that you have in the current mailbox, it might take some time to fully synchronise.
Please note that the application only works on current mailbox. If you want to sync emails from other mailboxes/folders, you would need to go to that folder and run the application again.
During the process, the application will first export the resources locally (into the folder you specify in the Environment Variables earlier) before they are then synched with the SBH portal. The reason is for record keeping purpose and so that you know which emails are synchronised.
SBH does NOT export the email body. Only the links and attachments. From the email metadata only Subject and Received Time are exported. A file called emails.json is created containing all relevant email records that will be synched with the portal.
You will also see numbered folders that contains the attachments.

Troubleshooting
In the case of errors, please try the following:
- Turn off Antivirus
- Turn off Firewall
- If the sync process still fails, please raise a Support Ticket and send us logfile.txt that gets generated during the sync process.
